Posts RSS Comments RSS 48 Posts and 155 Comments till now

Archive for the 'System' Category

Changing your default shell in Mac OS X 10.9 (Mavericks)

With the “Shellshock” vulnerability out in the wild and Macs defaulting to the Bash shell it seems a good precaution to change default shells until Apple patches the current implementation of Bash. Note that this technique also works in earlier versions of OS X.

To change shells in Terminal do the following:

Open Terminal

Type chsh -s /path/to/shell

The various shell paths are:

zsh – /bin/zsh
tcsh – /bin/tcsh
ksh – /bin/ksh
bash – /bin/bash
sh – /bin/sh

So, to change to the tcsh shell enter chsh -s /bin/tcsh

Enter your admin password when prompted and you’re done.
To check if the change took enter echo $SHELL
You should get the same path you just entered in the previous command. Once Apple patches the issue you can go back to Bash using the same technique.

If you want to wrap this in an AppleScript or add it to an Automater action for wider distribution just use do shell script . For example, to change to tcsh using AppleScript use the following:

do shell script “chsh -s /bin/tcsh” with administrator privileges

This will prompt for the users password (assuming they are an admin).

Fixing certificate errors for package installers in 10.7.4 and below

I recently had to build an installer package that used the Apple Developer ID Installer certificate. This is the first time I have signed an installer package and was interested to see how it worked with Gatekeeper. In PackageMaker you click on the “Configuration” tab for the installer then click on “Certificate” to select the appropriate one. Worked exactly as they say, found the cert and added it, no problem.

Next, I tested the installer to make sure it was signed correctly. You do that in Terminal using the spctl command:

sudo spctl -a -v --type install /Users/test/Desktop/MyInstaller.pkg
Password:
/Users/test/Desktop/MyInstaller.pkg: accepted source=Developer ID

Now I ran the package on both a 10.8.2 and 10.7.5 machine. Both of these OS versions have Gatekeeper. The package ran correctly and showed that the signing certificate was correct.

Now, to be certain I ran the package again on a 10.6.8 machine and a 10.7.4 machine since neither of these have Gatekeeper.

On the 10.7.4 machine I get a certificate error warning. It says my certificate isn’t signed by a trusted source and do I want to trust it. Looking at the certificate chain it all seems correct. Running a signed Cisco installer on the same system does not generate the same error, even though the root signing CA is exactly the same. The installer works but has that disturbing error message.

On a 10.6.8 machine the installer runs without a certificate warning but clicking on the cert button in the installer window says the same thing as the 10.7.4 machine, that it isn’t signed by a trusted source.

Cutting to the chase, the issue is with signing the installer using the GUI version of PackageMaker. It works just fine for 10.7.5 and up machines but gives all those errors below that. To get your signed installer to work on all versions of the OS you need to use the productsign tool at the command line. These instructions assume that you’ve already installed your Developer ID certificates.

Use the following steps to do that:

  1. Use the GUI version of PackageMaker to generate your installer but leave it unsigned.
  2. Run the following command to sign that package:
    productsign --sign "Developer ID Installer: My Company" /Users/test/Desktop/MyInstaller.pkg /Users/test/Desktop/Signed/MyInstaller.pkg
    Note:If you are signing an older style non-distribution package it will give you the following error:
    Could not find appropriate signing identity for "Developer ID Installer: My Company". An application signing identity (not an installer identity) is required for signing bundle-style products.

    If you get that error use the following format instead of the one listed above:

    productsign --sign "Developer ID Application: My Company" /Users/test/Desktop/MyInstaller.pkg /Users/test/Desktop/Signed/MyInstaller.pkg

To test if you have successfully signed the package use the spctl command:

sudo spctl -a -v --type install /Users/test/Desktop/Signed/MyInstaller.pkg
/Users/test/Desktop/Signed/MyInstaller.pkg: accepted source=Developer ID

Creating local snapshots in Time Machine in Lion 10.7

With the release of Lion Apple has added a new, somewhat hidden, ability to Time Machine. The ability to do local snapshots. Basically, when you are away from your Time Machine disc and have this enabled Lion will create your hourly snapshots locally instead of on your backup drive. Once you re-connect the drive it will move them over to your drive and wipe them off the local disc.

This is a great service for laptop users. Now you can have those hourly snapshots created no matter where you are. So, if you make some changes to a document while you’re away those changes will still be added to your Time Machine backup.

To enable these local snapshots you have use the new command-line tool for Time Machine named tmutil.

To enable local snapshots:

sudo tmutil enablelocal

To disable them AND clear all the local snapshots:

sudo tmutil disablelocal

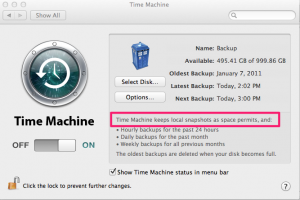
You can confirm that you’ve enabled local snapshots by opening System Preferences > Time Machine and looking for the line circled in the image.

Local Time Machine Snapshots

The tmutil utility has a bunch of other useful commands that allow you to enable or disable backups, start and stop backups, choose a new disk, etc. Type man tmutil to see the whole list. I can see this tool being used by lots of system administrators in scripts.

Apple also has a nice KB article explaining this feature here

Disable Directory Listing for User Sites Folder in Macintosh OS X

I’ve been using the “Sites” folder in my local home directory for some web development testing recently. I had a couple of directories created that didn’t include an “index.html” file. That means that anyone hitting the directory itself could list the contents and see all the other files I was working on in there. Not a major problem for what I was doing but a security issue none the less. After a quick bit of research I found it was quite easy to disable this at the command line.

Open Terminal and type cd /private/etc/apache2/users. Inside the “users” folder will be conf files for each of the users with accounts on the machine. So, if we have a user with the short name of “joe” on the machine there will be a file in there named “joe.conf”.

To edit this file you need to have root permissions. So open it using sudo. I prefer using pico as my editor but use whichever works for you. The command below assumes you are already in the “users” folder.

sudo pico joe.conf

You’ll see something like this:

Options Indexes MultiViews
AllowOverride None
Order allow,deny
Allow from all

Navigate down to the line Options Indexes MultiViews. Carefully delete the Indexes part of the line and save the file. Now restart Apache, either by going to System Preferences and turning off and then back on Web Sharing, or at the command line by typing sudo apachectl restart.

Now navigate to a directory in your “Sites” folder that doesn’t have an index file. You should get a “403 No permissions” error unless you specify a file. Much more secure. Note that you’ll need to do this individually for each account on the machine.

I’ve tested this with Snow Leopard and I’m betting it will work with Leopard. I’m not sure if versions of the OS below 10.5 support this feature.

Backing up MySQL databases on an OS X Server
I recently started using the build-in MySQL database server on my Leopard server. I’m collecting user login data in one database and SMB and AFP login information in another. Nothing major but information I wouldn’t really want to lose. I was looking for an easy way to backup these databases when a post on the MacEnterprise mailing list asked the same thing. Several people suggested AutoMySQLBackup, an open source shell script. After checking into it I can say it is an incredibly easy way of backing up all your data. The author has done a great service by posting this script.

The script backups up the databases to the local drive but can also email the backups to you. I wanted them emailed so I could archive them and have them backed up there as well. That way I don’t have to come up with any other scripts to move the backups some where else.

The AutoMySQLBackup script requires that you have Mutt installed if you want to have it email anything. Mutt is an command line email program that does not come pre-installed on OS X. Here are the steps I went through to get everything up and running.

Step 1 – Install Mutt

There are instructions on the Mutt website for installing the program but I wanted something I could easily update without a lot of hassle. I decided to install using MacPorts.

Download and install the latest version of MacPorts. There is excellent documentation on the web page. You’ll need the Apple Developer’s Tools installed before installing MacPorts. If you don’t already have them you can install them from your OS X install disc or download them from the Apple Developer Connection site.

Once MacPorts is installed an running you’re ready to install Mutt. At the time of this writing the default version of Mutt in the MacPorts repository is 1.4.2. I wanted the 1.5.x version as I had read that it was much easier to configure. Check the MacPorts list of available ports before you install. To get the 1.5.x version I had to install the development version.

In Terminal type the following:

sudo port install mutt-devel +smtp +ssl +imap +pop

If you want the standard install of mutt enter this:

sudo port install mutt +smtp +ssl +imap +pop

Then go do something else for a while as it downloads and compiles everything. After a bit you’ll have an install of mutt.

Step 2 – Configure Mutt

With the 1.5.x version of Mutt I only had to make one configuration file. In the home directory root of the account you are running the script from make a “.muttrc” file.

touch .muttrc

Now, use your favorite editor (I prefer pico) and add the address of the SMTP server you plan to use:

set smtp_url="smtp://my.smtp.server.com"

Now try sending an email from Mutt in Terminal and make sure everything is working correctly.

Step 3 – Configuring AutoMySQLBackup

Download AutoMySQLBackup and put it where ever you put your scripts. I changed the permission so that only the account I was running it from had any access.

chmod 700 automysqlbackup.sh

Open the script in your editor of choice. Don’t use Word or other such editors as they will mess up your line returns. Use a command-line editor or a GUI editor like SubEthaEdit that understands UNIX line returns.

The script author has great instructions right in the script so I won’t cover those here. I did, however, have to make two changes to the script to get things to work.

First, I had to add in the path to the MacPorts installation in the path variable for the script. That was on line 338.

The original reads:

PATH=/usr/local/bin:/usr/bin:/bin:/usr/local/mysql/bin

Edit it to look like this:

PATH=/opt/local/bin:/opt/local/sbin:/usr/local/bin:/usr/bin:/bin:/usr/local/mysql/bin

Remember, all the MacPorts installations live in /opt/local. Now the script can find Mutt.

The second change I had to make was to the order of items that the script was sending to Mutt. It just didn’t work in 1.5.x as written. This is on line 644 of the script.

The original reads:

mutt -s "$ERRORNOTE MySQL Backup Log and SQL Files for $HOST - $DATE" $BACKUPFILES $MAILADDR < $LOGFILE

I had to switch the order of $BACKUPFILES and $MAILADDR to get it send the file to me. So my edited version looks like this:

mutt -s "$ERRORNOTE MySQL Backup Log and SQL Files for $HOST - $DATE" $MAILADDR $BACKUPFILES < $LOGFILE

After making that switch and running the script it backed up my databases and emailed me the backup files as well. Fantastic!

Schedule your script to run on a nightly basis so you get regular backups of everything. You can either do that via cron or via a launchd item. If you want to use cron and don’t want to do it at the command line I recommend Cronnix. For launchd I recommend Lingon

One last note. When I was trying to troubleshoot why the attachments weren’t being send I couldn’t find the log files that said what was happening. That’s because the automysqlbackup script puts them in the script and then deletes them along with everything else after it mails them. To disable that function I had to comment out these two lines at the very end of the script:

eval rm -f "$LOGFILE"
eval rm -f "$LOGERR"

Once I had things working I uncommented them so things would continue to be cleaned up.

Switching between 32 bit and 64 bit mode in Snow Leopard

Out of the box Snow Leopard defaults to running in 32 bit mode. This is so the drivers for things like printers, scanners, network cards, etc. that have not been ported to 64 bit can run. Applications are unaffected by this. A 64 bit app will run in 32 bit mode and vice versa. If you’re not sure what mode your machine is running Snow Leopard in check out this article at MacObserver on how to tell.

The average user is much better off staying with the 32 bit mode for compatibility and ease of use. However, there may be times, especially for those running scientific software, when you need to run in 64 bit mode. And some servers, as mentioned in this Knowledge Base article do boot directly into 64 bit mode and may need to be set back.

You can choose to hold down the “6” and “4” keys on startup to boot into 64 bit mode. This will boot you into 64 bit for that boot cycle. When you reboot you will fall back to 32 bit again. Likewise, holding down the “3” and “2” keys on boot will put you into 32 bit mode.

If you want to change the mode and make it stick you need to do it at the command line. Fortunately Apple has added a command in the systemsetup tool for just that.

To check which mode you’re currently in run this command in Terminal:
systemsetup -getkernelbootarchitecturesetting

To set your machine to boot into 64 bit mode enter this command and reboot:
sudo systemsetup -setkernelbootarchitecture x86_64

To set your machine to boot into 32 bit mode enter this command and reboot:
sudo systemsetup -setkernelbootarchitecture i386

One oddity I’ve found so far is that on some machines that were upgraded from Leopard to Snow Leopard this command doesn’t appear in systemsetup. Do a man systemsetup before running it to make sure you have the Snow Leopard version of systemsetup

Using Time Machine with a networked drive

Those folks who are using Time Machine know how great it is for backing up everything quickly and easily. However, what if you can’t always have an external drive hooked up to your machine. Or, maybe you want to back up more then one machine to that drive. Time Machine backups live quite nicely next to other backups or files.

Out of the box Time Machine does not allow you to back up to a network drive. It just doesn’t show up when you go to choose a backup disk. You have to run a command in Terminal first to enable this function. On the machine you want to be able to access a network drive open Terminal and enter this command to enable networked drives in Time Machine:

defaults write com.apple.systempreferences TMShowUnsupportedNetworkVolumes 1

How to make your local external hard drive accesible to Time Machine

Now that you have your remote machine able to use Time Machine on a network drive how to you network the drive you want to use?

It’s important to know that Time Machine will only work on HFS+, also known as Mac OS Extended, drives. If your drive is formatted FAT or NTFS for use on Windows it won’t work. Also, Time Machine over the network only works for share points shared out using the version of AFP found in Leopard. You can’t share it off an older Tiger machine.

Create a share point for Time Machine

  • Open System Preferences and click on “Accounts”
  • Click on the lock at the bottom left of the window and enter your admin name and password.
  • Now click on the “+” at the bottom right of the window to create a new account. From the drop down at the top of the window select “Sharing only”. This will create an account that can only be used to access share points from the network. If you have that user already in your address book you can select them from that list. Otherwise just enter the desired name and password.

Now that you have an account for your network user to access the Time Machine share point you have to create it.

  • Create a folder on your local external drive to share out for backups
  • On a Leopard machine open System Preferences > Sharing. Then place a check next to File Sharing if it isn’t already checked.
  • Click on the “+” under “Shared Folders” and select the folder on your external drive.
  • The folder now shows up under “Shared Folders”. Select it and then click the “+” sign under “Users”. Add the “Sharing only” you created and make sure they have Read and Write permissions. You can delete the other users from that list so that only the remote user can access that share point if you prefer.

Configure Time Machine on the client

Now, go back to the remote machine and connect to that share point.

In the Finder select Go > Connect to Server and either put in the IP address of the machine you want to back up to or browse for it.

Once you’ve connected to the share go to System Preferences > Time Machine and click on the “Choose Backup Drive”. You should see your network share in the list. Select it and you’ll be asked for the login credentials again. Make sure you check the “Save in Keychain” option so you aren’t asked repeatedly.

Now configure Time Machine the way you want and you’re set!

Every time Time Machine runs it will mount that share point, back up to it and then unmount it. One of the security benefits from using Time Machine like this is that all of the files are saved in an encrypted disk image so they are more secure then a regular time machine backup.

Determining if an application is 64 bit, 32 bit or both

With the release of Leopard Macs now have the ability to run 64 bit applications natively from the GUI. Tiger, the previous release of the OS, supported 64 bit applications but only at the command line. Also, most Macintosh applications these days come as Universal Binaries so they can run on Intel and PowerPC machines.

So how do you tell if you have a 64 bit capable application?

The first place to look is the “Get Info” box of the application itself. If it has a checkbox that gives you the option to run it as a 32 bit application then it is 64 bit. But, is it 64 bit for Intel machines only or for both PowerPC and Intel?

The solution to the problem is found in Terminal using the file command.

Open up Terminal and cd into your application and find the actual compiled binary. This is located in /Contents/MacOS inside your application.

So, for example, if I wanted to check out iWeb I would type the following:

cd /Applications/iWeb.app/Contents/MacOS/

Typing ls once you are inside the app will show you the actual name of the binary.

Now, use the file command on that binary.

file iWeb

That returns the following:


iWeb: Mach-O universal binary with 2 architectures
iWeb (for architecture ppc): Mach-O executable ppc
iWeb (for architecture i386): Mach-O executable i386

Here’s how to read the results:

(for architecture ppc) = 32 bit PowerPC executable
(for architecture ppc64) = 64 bit PowerPC executable
(for architecture i386) = 32 bit Intel executable
(for architecture x86_64) = 64 bin Intel executable

So, we can see that iWeb has one 32 bit executable for PowerPC machines and one 32 bit executable for Intel (i386) machines.

Turning your Airport Card on and off

This is a simple tip I stumbled across a month or so ago. There were some bugs in Leopard wireless that wouldn’t let me connect to the encrypted wireless network at work after a machine was restarted. I found that turning the airport card on and off let me connect again. I hated having to remember this every time I restarted so I dug around and found that the command line tool networksetup can do it for me. Great!

This tool exists on Tiger machines in the Apple Remote Desktop client bundle. The path to it is:

/System/Library/CoreServices/RemoteManagement/ARDAgent.app/Contents/Support/networksetup

Fortunately they very kindly included it in the build for Leopard. The path in Leopard is:

/usr/sbin/networksetup

So, in Leopard, to turn the Airport card off enter the following in Terminal:

/usr/sbin/networksetup -setairportpower off

To turn the card back on change “off” to “on”. If you’re running Tiger make sure to change the path so it points to the app correctly.

Put both of these commands in an AppleScript, save it as an application and add it to your Login items. Then, when the machine is rebooted the card gets turned off and then on and in my case makes my wireless connection.

Snow Leopard changes
In Snow Leopard the command remains, however now you need to run it as sudo. You also need to include the actual network device name AirPort is running on. You can get that by running the following command:

/usr/sbin/networksetup -listallhardwareports

You’ll see Airport listed and below it the device. If the machine does not have two Ethernet ports AirPort is commonly listed as “en1”

After you have that you include it in your command:

sudo /usr/sbin/networksetup -setairportpower en1 on

I’ve included these changes and a routine that will find the airport device in the Snow Leopard version of the script.

Click here to download a copy of the script for Tiger/Leopard:
Airport off and on

Click here to download a copy of the script for Snow Leopard:
Snow Leopard Airport off and on

networksetup is a great tool for administrators and even just people who want a little more control over their machines.

Enabling clear text passwords in Leopard with AppleScript

Note: The method for doing this in Snow Leopard is almost the same but has one slight change to it. Check out the post on doing enabling this in Snow Leopard for the changes.

Leopard, by default, has clear text passwords disabled for AFP connections. This is of course a very good thing to do. No one should be using clear text password connections anymore. However, there are still some older implementations of AFP out there on servers that require a clear text password. So, how do you enable them? By editing a property list or .plist file.

The file in question here is named “com.Apple.AppleShareClient.plist”. It’s located in the Library/Preferences folder in each users home folder. Now, there are a couple of ways to edit this file. If you have the Developer’s Tools installed you can use Property List editor to change that setting from “NO” to “YES”.

Or, if you prefer a command line approach you can use the defaults command to write your settings to the file.

defaults write com.Apple.AppleShareClient afp_cleartext_allow -bool YES

If you’re not sure if clear text passwords are enabled you can use the “read” function in defaults to read the value

defaults read com.Apple.AppleShareClient afp_cleartext_allow

A returned value of “0” means it is disabled. A value of “1” means enabled.

If you have a lot of users that need to have this enabled or even checked that’s a lot of typing. So, once again AppleScript to the rescue.

This script will check the status of clear text passwords on launch. If it’s already enabled it will ask if the user wants to disable it. If it’s not enabled it will ask to enable it.

So, just launching the script will let you see if you need to do anything or not. Saving this an application and emailing it to users is a quick way to have them enable it if they need it and then disable it when the need is over without you having to walk over there and type everything a bunch of times.

If you would prefer to download a pre-complied script file click below:

Leopard Clear Text script

[codesyntax lang=”applescript” lines=”no”]
try
set clearStatus to (do shell script “defaults read com.Apple.AppleShareClient afp_cleartext_allow”) as number
on error
-the first command will throw an error if the afp_cleartext_allow setting does not exist
-if there is an error we’ll assume that the setting isn’t there and set our variable to the disabled setting
set clearStatus to 0
end try
-a status of “1” means it’s enabled. So ask if they want to disable it
if clearStatus is 1 then
display dialog “Do you want to disable clear text passwords?” buttons {“Cancel”, “Disable”} default button 2
if the button returned of the result is “Disable” then
do shell script “defaults write com.Apple.AppleShareClient afp_cleartext_allow -bool NO”
set clearStatus to (do shell script “defaults read com.Apple.AppleShareClient afp_cleartext_allow”) as number
-check to make sure the change really took effect
if clearStatus is 0 then
display dialog “Clear text passwords have been disabled” buttons {“OK”}
else
display dialog “There was an error disabling clear text passwords!” buttons {“OK”}
end if
end if
else
display dialog “Do you want to enable clear text passwords?” buttons {“Cancel”, “Enable”} default button 2
if the button returned of the result is “Enable” then
do shell script “defaults write com.Apple.AppleShareClient afp_cleartext_allow -bool YES”
set clearStatus to (do shell script “defaults read com.Apple.AppleShareClient afp_cleartext_allow”) as number
-check to make sure the change really took effect
if clearStatus is 1 then
display dialog “Clear text passwords have been enabled” buttons {“OK”}
else
display dialog “There was an error enabling clear text passwords!” buttons {“OK”}
end if
end if
end if
[/codesyntax]

Next »