Posts RSS Comments RSS 48 Posts and 155 Comments till now

Archive for the 'shell scripts' Category

Creating local snapshots in Time Machine in Lion 10.7

With the release of Lion Apple has added a new, somewhat hidden, ability to Time Machine. The ability to do local snapshots. Basically, when you are away from your Time Machine disc and have this enabled Lion will create your hourly snapshots locally instead of on your backup drive. Once you re-connect the drive it will move them over to your drive and wipe them off the local disc.

This is a great service for laptop users. Now you can have those hourly snapshots created no matter where you are. So, if you make some changes to a document while you’re away those changes will still be added to your Time Machine backup.

To enable these local snapshots you have use the new command-line tool for Time Machine named tmutil.

To enable local snapshots:

sudo tmutil enablelocal

To disable them AND clear all the local snapshots:

sudo tmutil disablelocal

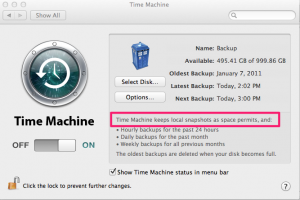
You can confirm that you’ve enabled local snapshots by opening System Preferences > Time Machine and looking for the line circled in the image.

Local Time Machine Snapshots

The tmutil utility has a bunch of other useful commands that allow you to enable or disable backups, start and stop backups, choose a new disk, etc. Type man tmutil to see the whole list. I can see this tool being used by lots of system administrators in scripts.

Apple also has a nice KB article explaining this feature here

How to back up Address Book automatically

For quite a while now you’ve been able to manually backup your entire Address Book. This has saved many people massive heartache when they’ve had their machines go down/did an OS re-install or various other scary things (Yeah, I know, if you have MobileMe you don’t need to do this but most people don’t).

The big issue with backing up this way, as with any backup, is getting people to do it and do it regularly. To backup your Address Book all you need to do it copy the /Users/”user name”/Library/Application Support/AddressBook folder in each users home directory. Simple, direct and easy. But you may have noticed that when you do a manual backup via the Address Book application you get a file with the “.abbu” extension. That’s just the AddressBook folder renamed and getting that extension. The beauty of having this file is when you want to restore your Address Book via the menu you can just point to this file. Otherwise you have to drag the backed up folder to the original spot. Again, not hard to do but some users have problems doing things that go outside of clicking on a menu item.

So, to back up your Address Book and put it in nice “.abbu” file for easy restores just do this:
[codesyntax lang=”bash”]
filedate=`/bin/date “+%m-%d-%y”`
cp -R “/Users/username/Library/Application Support/AddressBook” “/Users/username/Documents/Address Book Backups/Address Book Backup $filedate.abbu”
[/codesyntax]

Obviously you change the “username” section to the name of the home directory. Also, you can change the backup folder to what ever you want. This script just appends the current date to the backup so you can keep multiple backups if needed.

To run this you have a bunch of options:

  1. You can run it via cron or launchd. Just put the two lines together and seperated by a “;”.
  2. You can run it as an Automator iCal plug-in. Just drag over the “Run Shell Script” action and paste in the script. Then schedule it via iCal.
  3. You can save it as a script and run it from what ever automation application you prefer.

Creating printers in Terminal

Using the Printer Setup Utility in OS X is a very easy and simple way to create printers on a Mac. But occasionally you might have need to create printers at the command line. For example, you might want to create printers on remote machines that only have shell access. Or you might want to add the ability to create printers to a login script or a script that runs after a machine is re-imaged.

Well, the command to do this is lpadmin. lpadmin is used mainly to set up network printers. It’s the command line utility for CUPS, the underlying printing architecture of OS X. As usual you can type man lpadmin to get all the gory details. In this post I’m going to cover how to create a printer and how to delete one using Terminal and lpd.

Creating a new printer

The syntax to create a new printer is:

/usr/sbin/lpadmin -p "name of printer" -E -v lpd://"printer IP or DNS"/"queue name" -P "path to PPD file" -D "description"

The name of the printer is whatever you want the user to see, such as “color laser printer”. Just remember if your name has spaces in it you’ll either need to escape the spaces or quote the name. Also, the name cannot contain any non-printable characters (ex. % $ &). The description field, however, can. If you use the description field that is the name that appears in Printer Setup Utility. If you don’t then the name given in the - p flag will be the name.

All of the standard PPD files on a Mac are kept in /Library/Printers/PPD/Contents/Resources/en.lprog/. The actual PPD file will be contained in a .gz file. You just need to point to that file.

So, for our example we’ll set up a printer with the following attributes:

Name: Color_Laser
Type: HP Color Laser 4700
Print server: print.example.com
print queue: color_laser
description: Color Laser (Front Office)

So our command in the Terminal would be this:

usr/sbin/lpadmin -p Color_Laser -E -v lpd://print.example.com/color_laser -P /Library/Printers/PPDs/Contents/Resources/en.lproj/HP\ Color\ LaserJet\ 4700.gz -D "Color Laser (Front Office)"

Note that I quoted the “Color Laser (Front Office)” part to get around spaces in the name. That’s the name that appears in Printer Setup Utility.

Deleting a Printer

Deleting a printer is much easier. All you need is the name.

The syntax to delete a printer is:

/usr/sbin/lpadmin -x "name of printer"

If I wanted to delete the printer I just created all I would need to do is this:

/usr/sbin/lpadmin -x "Color Laser"

Note: The name you’re deleting is the name you gave it in the - p flag, not the description. So putting “Color Laser (Front Office)” in this would not work.

If you’ve forgotten what names you gave the printers open up a web browser on your machine and enter “http://127.0.0.1:631/printers”. That will take you to the configuration page for CUPS, which will list the printers by name.

Creating printers in AppleScript

You can wrap all of these commands up in an AppleScript and send it to users so they can install printers with just a click. Just wrap the commands in a do shell script command.

The one gotcha is because you are using quotes in the Terminal command AND you have to quote to actual command in AppleScript you have to escape the internal quotes by putting a “\” before each quote. You also have to escape and “escapes” you had in the original command.

To compare, here is the original command:

/usr/sbin/lpadmin -p "Color_Laser" -E -v lpd://print.example.com/color_laser -P /Library/Printers/PPDs/Contents/Resources/en.lproj/HP\ Color\ LaserJet\ 4700.gz -D "Color Laser (Front Office)"

And here is the command with the “do shell script” command in AppleScript:

[codesyntax lang=”applescript” lines=”no”]do shell script “/usr/sbin/lpadmin -p Color_Laser -E -v lpd://print.example.com/color_laser -P /Library/Printers/PPDs/Contents/Resources/en.lproj/HP\\ Color\\ LaserJet\\ 4700.gz -D \”Color Laser (Front Office)\””[/codesyntax]

Get the system version using Terminal

There is a nice utility available from the command line that allows you get some basic system information quickly. All of this information is available in other places but there are times when it’s easier to get it at the command line.

Open up Terminal and type “sw_vers” (no quotes) and hit return. The results you’ll get look like this:


ProductName: Mac OS X
ProductVersion: 10.4.9
BuildVersion: 8P135

You can use different variations such as “sw_vers -productVersion” to get just that information. On the same machine in the first example that would return:


10.4.9

I recently had a need to get this information at the command line for an installer I was building. I only needed to know the first part of the product version (10.3, 10.4, etc.) so I put together a short shell script to grab that information for me.


#!/bin/bash

sysver=`sw_vers -productVersion | cut -c 1-4`
echo $sysver

if [ $sysver = 10.4 ]; then
echo "This is a Tiger System"
elif [ $sysver = 10.3 ]; then
echo "This is a Panther System"
else
echo "This system is too old"
fi

This script was just a “proof of concept” on for me. Once I knew it worked I could control what things happened depending on if the machine was running 10.4, 10.3 or an older version. Just substitute the “echo” statements for what should happen. If you want to try this out paste the script into a plain text document and save it with a “.sh” extension. Go into Terminal and make it executable with chmod.

Setting the startup disk using Terminal

While it’s quite easy to change which disk your machine starts up from using System Preferences there may be times when you need/want to do it either at the command line or within a script.

The command for setting the startup disk using Terminal is “bless“. To get the full story on “bless” open up Terminal and type “man bless” (no quotes).

To change the startup disk type the following in Terminal:

sudo bless -mount /Volumes/"name of your startup disk" -setBoot

So, if the desired disk was named “TestDisk” you would type this:

sudo bless -mount /Volumes/TestDisk -setBoot

If your disk name has spaces in it you’ll need to put quotes around the path to the disk, like this:

sudo bless -mount "/Volumes/My Disk" -setBoot

You can incorporate this into a UNIX shell script to reboot your machine to another disk at a certain time. Perhaps you want to reboot to another disk every Friday to run a disk utility on it, or to image it.


#!/bin/bash
bless -mount /Volumes/TestDisk -setBoot
shutdown -r now

Breaking down this script the first line sets the disk your Mac will boot from. The second line tells it to shutdown and restart immediately. If you have an Intel Mac you can add “–nextonly” at the end of the “bless” line. That will boot the machine to that volume first and then boot back to the original volume on subsequent reboots without having to reset the startup disk.

This command also comes in handy if you’re booting back and forth between volumes to test things. For example, you have a partition with 10.3 and another with 10.4 on it and you want to test some software in 10.3. You can wrap all of this up in an AppleScript and either save it on your desktop as an application or save it as a script and put it in your Script menu.

Paste this code in Script Editor and run it. Make sure you change the disk name to your disk. What for the AppleScript line breaks in the code. Any line that ends in “¬” means the line below is part of the same line. Pasting it in as it is on the web page will still work however.

[codesyntax lang=”applescript” lines=”no”]
do shell script “bless -mount \”/Volumes/Drive Name\” ¬
-setBoot with administrator privileges
do shell script “shutdown -r now” with administrator privileges
[/codesyntax]

Then simply click on the application or select if from the Script menu, enter your admin name and password and it will select the disk and reboot for you.

If you want to choose between several disks you can add in a dialog box to let you choose the correct disk.

[codesyntax lang=”applescript” lines=”no”]
display dialog “Select a startup disk” buttons ¬
{“name of disc 1”, “name of disc 2”]
set bootVol to the button returned of the result as text
do shell script “bless -mount \”/Volumes/” ¬
& bootVol & “\” -setBoot” with administrator privileges
do shell script “shutdown -r now” with administrator privileges
[/codesyntax]