Posts RSS Comments RSS 48 Posts and 155 Comments till now

Changing your default shell in Mac OS X 10.9 (Mavericks)

With the “Shellshock” vulnerability out in the wild and Macs defaulting to the Bash shell it seems a good precaution to change default shells until Apple patches the current implementation of Bash. Note that this technique also works in earlier versions of OS X.

To change shells in Terminal do the following:

Open Terminal

Type chsh -s /path/to/shell

The various shell paths are:

zsh – /bin/zsh
tcsh – /bin/tcsh
ksh – /bin/ksh
bash – /bin/bash
sh – /bin/sh

So, to change to the tcsh shell enter chsh -s /bin/tcsh

Enter your admin password when prompted and you’re done.
To check if the change took enter echo $SHELL
You should get the same path you just entered in the previous command. Once Apple patches the issue you can go back to Bash using the same technique.

If you want to wrap this in an AppleScript or add it to an Automater action for wider distribution just use do shell script . For example, to change to tcsh using AppleScript use the following:

do shell script “chsh -s /bin/tcsh” with administrator privileges

This will prompt for the users password (assuming they are an admin).

Mavericks 10.9 Certification and Training Books

All of the Mavericks 10.9 Apple Certification and Training books are now available. The classes should be available staring sometime in January. I thought I’d put up a listing of all the books for those who are looking to get certified or just brush up on their skills. As both an Apple Certified Technical Coordinator and Apple Certified Trainer I can honestly say that taking the classes is the best way to learn these skills. You will get hands on experience and be trained by people who really know their stuff and can answer your questions. However, these books are a great brush up on your skills or to see how much you really know. You can also use these as study guides for the Apple Certification exams. Click here if you are interested in the Mountain Lion Certification books. To purchase the books for the discontinued Snow Leopard courses such as Deployment Click here.

Mavericks 101 OS X Support Essentials

Mavericks 201 OS X Server Essentials

Fixing certificate errors for package installers in 10.7.4 and below

I recently had to build an installer package that used the Apple Developer ID Installer certificate. This is the first time I have signed an installer package and was interested to see how it worked with Gatekeeper. In PackageMaker you click on the “Configuration” tab for the installer then click on “Certificate” to select the appropriate one. Worked exactly as they say, found the cert and added it, no problem.

Next, I tested the installer to make sure it was signed correctly. You do that in Terminal using the spctl command:

sudo spctl -a -v --type install /Users/test/Desktop/MyInstaller.pkg
Password:
/Users/test/Desktop/MyInstaller.pkg: accepted source=Developer ID

Now I ran the package on both a 10.8.2 and 10.7.5 machine. Both of these OS versions have Gatekeeper. The package ran correctly and showed that the signing certificate was correct.

Now, to be certain I ran the package again on a 10.6.8 machine and a 10.7.4 machine since neither of these have Gatekeeper.

On the 10.7.4 machine I get a certificate error warning. It says my certificate isn’t signed by a trusted source and do I want to trust it. Looking at the certificate chain it all seems correct. Running a signed Cisco installer on the same system does not generate the same error, even though the root signing CA is exactly the same. The installer works but has that disturbing error message.

On a 10.6.8 machine the installer runs without a certificate warning but clicking on the cert button in the installer window says the same thing as the 10.7.4 machine, that it isn’t signed by a trusted source.

Cutting to the chase, the issue is with signing the installer using the GUI version of PackageMaker. It works just fine for 10.7.5 and up machines but gives all those errors below that. To get your signed installer to work on all versions of the OS you need to use the productsign tool at the command line. These instructions assume that you’ve already installed your Developer ID certificates.

Use the following steps to do that:

  1. Use the GUI version of PackageMaker to generate your installer but leave it unsigned.
  2. Run the following command to sign that package:
    productsign --sign "Developer ID Installer: My Company" /Users/test/Desktop/MyInstaller.pkg /Users/test/Desktop/Signed/MyInstaller.pkg
    Note:If you are signing an older style non-distribution package it will give you the following error:
    Could not find appropriate signing identity for "Developer ID Installer: My Company". An application signing identity (not an installer identity) is required for signing bundle-style products.

    If you get that error use the following format instead of the one listed above:

    productsign --sign "Developer ID Application: My Company" /Users/test/Desktop/MyInstaller.pkg /Users/test/Desktop/Signed/MyInstaller.pkg

To test if you have successfully signed the package use the spctl command:

sudo spctl -a -v --type install /Users/test/Desktop/Signed/MyInstaller.pkg
/Users/test/Desktop/Signed/MyInstaller.pkg: accepted source=Developer ID

Mountain Lion 10.8 Apple Training and Certification books

All of the Mountain Lion 10.8 Apple Certification and Training books are now available as are all the classes. I thought I’d put up a listing of all the books for those who are looking to get certified or just brush up on their skills. As both an Apple Certified Technical Coordinator and Apple Certified Trainer I can honestly say that taking the classes is the best way to learn these skills. You will get hands on experience and be trained by people who really know their stuff and can answer your questions. However, these books are a great brush up on your skills or to see how much you really know. You can also use these as study guides for the Apple Certification exams. You’ll also notice that the books are broken down into smaller sections and have all of the exercises. If you have the equipment at home you can now go through all of the exercises yourself. Click here if you are interested in the Lion Certification books. To purchase the books for the discontinued Snow Leopard courses such as Deployment click here.

Mountain Lion 101 OS X Support Essentials

Mountain Lion 201 OS Server Essentials 10.8

Quick Applescript to check your Mac for the Flashback infection

There is lots of media exposure on the possibility that multiple Macs may be infected by a trojan called “Flashback“. This involves a vulnerability in Java that malicious websites can exploit.

If you have Java on your Mac you need to make sure you have updated to the latest Java update from Apple to patch this issue. The easiest way is to just run Software Update on your Mac and get the latest updates from Apple. You can download them manually as well from Apple:

If you are concerned that you might already be infected F-Secure has some excellent instructions on how to find out here. The Applescript below will run the commands referenced in the F-Secure article to do a quick and dirty check. If everything comes back clean it will tell you. If it comes back as possibly infected it will direct you (or your user) to the website for more detailed information.

I’m posting it as a script file for download here:
Flashback Checker Script

Or you can copy the code from here and paste it into AppleScript Editor to run:

[codesyntax lang=”applescript”]
–see if this entry exists. If not an error will occur and be trapped
try
do shell script “defaults read /Applications/Safari.app/Contents/Info LSEnvironment”
–set this variable if this entry exists
set LSE to “true”
on error errmsg
–set this variable if the error contains the message “does not exist”
if errmsg contains “does not exist” then
set LSE to “false”
end if
end try

–search Firefox for infections
try
do shell script “defaults read /Applications/Firefox.app/Contents/Info LSEnvironment”
–set this variable if this entry exists
set FLSE to “true”
on error errmsg
–set this variable if the error contains the message “does not exist”
if errmsg contains “does not exist” then
set FLSE to “false”
end if
end try

–see if this entry exists. If not an error will occur and be trapped
try
do shell script “defaults read ~/.MacOSX/environment DYLD_INSERT_LIBRARIES”
set DLib to “true”
on error errmsg
–set this variable if the error contains the message “does not exist”
if errmsg contains “does not exist” then
set DLib to “false”
end if
end try

–if all variables are false then the machine isn’t infected
if LSE is “false” and DLib is “false” and FLSE is “false” then
display dialog “You are not infected with Flashback”

–if any variable is true the machine may be infected and needs closer inspection
else if LSE is “true” or DLib is “true” or FLSE is “true” then
display dialog “You may have the Flashback infection” & return & “Go to following URL for more information:” & return & return & “http://www.f-secure.com/v-descs/trojan-downloader_osx_flashback_i.shtml”
end if
[/codesyntax]

Creating local snapshots in Time Machine in Lion 10.7

With the release of Lion Apple has added a new, somewhat hidden, ability to Time Machine. The ability to do local snapshots. Basically, when you are away from your Time Machine disc and have this enabled Lion will create your hourly snapshots locally instead of on your backup drive. Once you re-connect the drive it will move them over to your drive and wipe them off the local disc.

This is a great service for laptop users. Now you can have those hourly snapshots created no matter where you are. So, if you make some changes to a document while you’re away those changes will still be added to your Time Machine backup.

To enable these local snapshots you have use the new command-line tool for Time Machine named tmutil.

To enable local snapshots:

sudo tmutil enablelocal

To disable them AND clear all the local snapshots:

sudo tmutil disablelocal

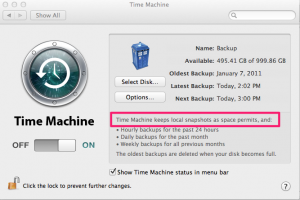
You can confirm that you’ve enabled local snapshots by opening System Preferences > Time Machine and looking for the line circled in the image.

Local Time Machine Snapshots

The tmutil utility has a bunch of other useful commands that allow you to enable or disable backups, start and stop backups, choose a new disk, etc. Type man tmutil to see the whole list. I can see this tool being used by lots of system administrators in scripts.

Apple also has a nice KB article explaining this feature here

Hiding old purchases in the iTunes/Mac App stores

Just about everyone with an iOS device has bought or gotten free apps that they thought would be cool or useful and then decided they didn’t need it. Deleting from your device is easy but what about your iTunes library? Especially now with iCloud keeping track of everything it’s not so obvious. It’s an especially annoying thing when you keep seeing updates for all those apps showing up in the various App stores. With the release of iTunes 10.5 you can now hide those apps from view AND from updating.

The technique is basically the same in iTunes as well as on your device:

  1. Click on the iTunes Store
  2. Click the Purchased link on the far right
  3. Pick your content (Music, Books, Apps, etc.)
  4. Hover over the item you want to hide until you see the “X”
  5. Click the “X” to hide that purchase

Here are the links to the Apple KB articles on both the iTunes and Mac App stores and how to hide the unwanted apps.

iTunes Store: Hiding and unhiding purchases

Mac App Store: Hiding and unhiding purchases

Viewing or hiding hidden files in the Finder using AppleScript

Mac OS X has a lot of files that are hidden from view in the Finder. They are hidden for a very good reason, which is most of them are system files that you don’t need to mess with if you want your computer to keep working well. However, there are occasions where it would nice to be able to view these files in the Finder.

This script lets you toggle the view on and off. So, you can turn it on, do what you need and then turn it off.

[codesyntax lang=”applescript”]
try
set toggleView to (do shell script “defaults read com.apple.Finder AppleShowAllFiles”)
on error
set toggleView to “NO”
end try

if toggleView is “NO” or toggleView is “0” then
set br to display dialog “Showing hidden files is disabled.” & return & “Would you like to enable it?” buttons {“Yes”, “No”} default button {“No”}
set theAnswer to the button returned of br
if theAnswer is “Yes” then
do shell script “defaults write com.apple.Finder AppleShowAllFiles YES”
do shell script “killall Finder”
display dialog “Showing hidden files has been enabled” buttons {“Ok”} giving up after 5
end if
else
if toggleView is “YES” or toggleView is “1” then
set br to display dialog “Showing hidden files is enabled.” & return & “Would you like to disable it?” buttons {“Yes”, “No”} default button {“Yes”}
set theAnswer to the button returned of br
if theAnswer is “Yes” then
do shell script “defaults write com.apple.Finder AppleShowAllFiles NO”
do shell script “killall Finder”
display dialog “Showing hidden files has been disabled” buttons {“Ok”} giving up after 5
end if
end if
end if
[/codesyntax]

Copy the code into AppleScript Editor and then save it out as an application. Double clicking on it will bring up a dialog box telling you the current state of viewing hidden files and gives you the option of switching it. Since you have to restart the Finder after you make this change you’ll see the Finder quit and restart.

Opening a FaceTime connection via AppleScript/Automator

The new FaceTime video chat beta is now available from Apple. It allows you to video chat with anyone using that app on any Mac running the service as well as an iPhone 4 or the latest iPod running iOS 4 or better. It’s extremely easy and I can see a lot of great uses for it.

One of the very cool things about it is that you can use a URL to initiate a FaceTime call. As described in this Mac OS X Hints article just use the following syntax:

  • facetime://appleid
  • facetime://email@address
  • facetime://phone# as a URL in Safari’s address bar.

Since you can use a URL that means you can use AppleScript to connect to a session or Automator to even schedule and initiate a call using iCal Alarms.

The only line you need is this:

[codesyntax lang=”applescript] open location “facetime://joe@emailaddress.com”[/codesyntax]

Obviously you can use any of the URL syntaxes listed above in place of the email address. Save it as a script/application/workflow and you’re ready to chat!

How to back up Address Book automatically

For quite a while now you’ve been able to manually backup your entire Address Book. This has saved many people massive heartache when they’ve had their machines go down/did an OS re-install or various other scary things (Yeah, I know, if you have MobileMe you don’t need to do this but most people don’t).

The big issue with backing up this way, as with any backup, is getting people to do it and do it regularly. To backup your Address Book all you need to do it copy the /Users/”user name”/Library/Application Support/AddressBook folder in each users home directory. Simple, direct and easy. But you may have noticed that when you do a manual backup via the Address Book application you get a file with the “.abbu” extension. That’s just the AddressBook folder renamed and getting that extension. The beauty of having this file is when you want to restore your Address Book via the menu you can just point to this file. Otherwise you have to drag the backed up folder to the original spot. Again, not hard to do but some users have problems doing things that go outside of clicking on a menu item.

So, to back up your Address Book and put it in nice “.abbu” file for easy restores just do this:
[codesyntax lang=”bash”]
filedate=`/bin/date “+%m-%d-%y”`
cp -R “/Users/username/Library/Application Support/AddressBook” “/Users/username/Documents/Address Book Backups/Address Book Backup $filedate.abbu”
[/codesyntax]

Obviously you change the “username” section to the name of the home directory. Also, you can change the backup folder to what ever you want. This script just appends the current date to the backup so you can keep multiple backups if needed.

To run this you have a bunch of options:

  1. You can run it via cron or launchd. Just put the two lines together and seperated by a “;”.
  2. You can run it as an Automator iCal plug-in. Just drag over the “Run Shell Script” action and paste in the script. Then schedule it via iCal.
  3. You can save it as a script and run it from what ever automation application you prefer.

Next Page »